Angular SSR and Rendering Methods: Building Blazing Fast Web Apps
Unlock faster Angular apps with Server-Side Rendering (SSR). This guide demystifies SSR, its benefits (speed, SEO), and setup in v20. Essential for modern Angular dev.


The web is evolving, and so is Angular. With the recent release of Angular v20 (and features refined in preceding versions), Server-Side Rendering (SSR) and Hydration are no longer niche concepts but core tools for building high-performance, SEO-friendly applications. If you've been wondering how to leverage these powerful features, you're in the right place. This article, inspired by a recent deep-dive video, will demystify SSR, explain its benefits, and walk you through setting it up in a fresh Angular application.
What is Server-Side Rendering (SSR)?
Let's start with the basics. What exactly is SSR?
Server-Side Rendering (SSR) generates the complete HTML for a page on the server on each request, then sends it to the browser for immediate display.
The key phrase here is "on demand." This means every time a user (or a search engine bot) requests a specific page configured for SSR, the server dynamically generates the full HTML for that page and sends it back.
This is in contrast to pure Client-Side Rendering (CSR), where the server sends a minimal HTML shell, and JavaScript then takes over in the browser to render the content.
Why Bother with SSR? The Perks Explained
SSR isn't just a fancy buzzword; it offers tangible benefits:
- Faster First-Paint: Users see meaningful content much sooner because the HTML arrives fully rendered from the server. This significantly improves the perceived performance and avoids the dreaded "blank screen" or excessive loading spinners that can plague CSR apps during initial load.
- SEO & Social Previews: Search engine bots and social media crawlers can easily index pre-rendered content directly. Since the HTML is complete, bots don't need to execute JavaScript to see the page's content, leading to better discoverability and richer social media previews.
- Predictable Data Fetching: The server can fetch all necessary data before rendering the page. This avoids client-side "waterfalls" of data requests, where one request depends on the completion of another, leading to a more streamlined and often faster data loading experience.
The SSR Flow: A Visual Journey
Understanding the lifecycle of an SSR request helps clarify how it works:
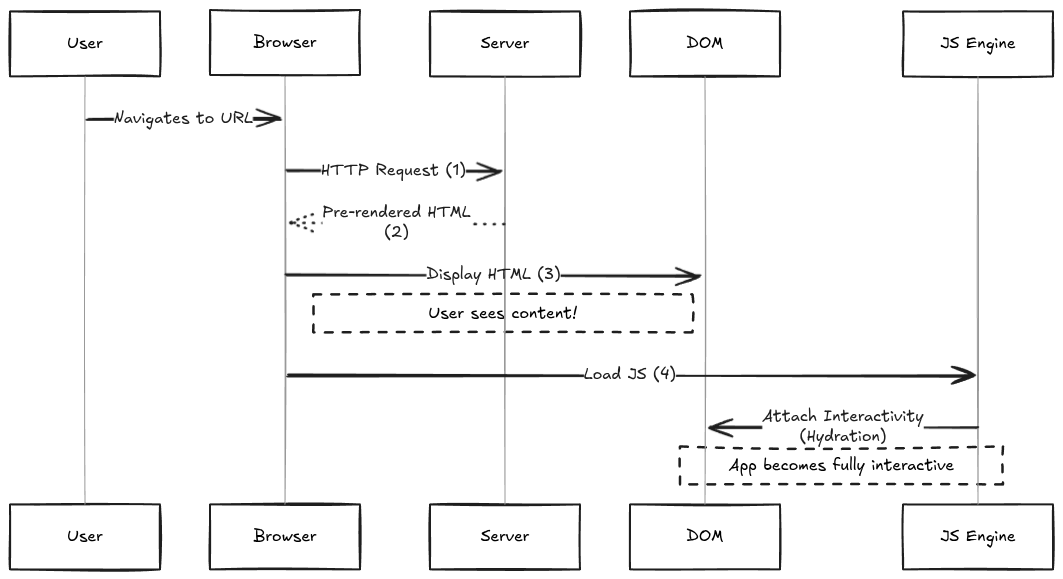
- HTTP Request: The user's browser requests a page from the server.
- Pre-rendered HTML: The server processes the request, renders the Angular application into HTML, and sends this fully formed HTML back to the browser.
- Display HTML: The browser receives the HTML and immediately displays it. The user sees content quickly!
- Load JS & Attach Interactivity: The browser then downloads the JavaScript bundles. Once loaded, Angular "hydrates" the static HTML, attaching event listeners and making the page interactive.
SSR vs. CSR: A Quick Comparison
| Feature | Server-Side Rendering (SSR) | Client-Side Rendering (CSR) |
|---|---|---|
| Initial Load | Faster meaningful content display. | Sends HTML shell; JS renders content, can be slower initially. |
| SEO | Excellent, as content is readily available to crawlers. | Can be challenging; crawlers may need to execute JS. |
| Server Load | Higher, as server renders HTML for each request (for SSR routes). | Lower, as rendering is offloaded to the client. |
| Interactivity | Content visible before JS loads; interactivity after hydration. | Interactivity available once JS loads and executes. |
| Subsequent Nav | Can be slower if each page is a full server request. | Typically faster after initial load, as only data/JS chunks are fetched. |
A key point: In a typical modern Angular app with SSR, initial navigation to a route is server-rendered. Subsequent navigations within the app are often handled client-side, giving you the best of both worlds.
A Practical Dive: Setting Up SSR in Angular
Enough theory! Let's get our hands dirty and set up an Angular application with SSR.
Prerequisites:
Ensure you have Node.js and the latest Angular CLI installed.
npm install -g @angular/cli@latest
ng --version # Verify you're on a recent version, ideally v20+ for latest features
1. Creating the App with SSR:
Angular CLI makes it incredibly simple to scaffold a new SSR-enabled project:
ng new ng-v20-ssr-demo --ssr
The CLI will prompt you for preferences (e.g., stylesheet format, standalone components). For this demo, we'll use CSS and say 'No' to a zoneless application for now to keep things standard.
Once done, navigate into your project:
cd ng-v20-ssr-demo
2. Exploring Key Files:
The --ssr flag configures several files automatically:
-
angular.json:
Underprojects > ng-v20-ssr-demo > architect > build > options, you'll find SSR-specific configurations:"ssr": { "entry": "src/main.server.ts" }, "server": "src/main.server.ts", // For older Angular versions, this might be separate "prerender": true // Or an object with routesThis tells the build process where the server entry point is.
-
src/main.server.ts: This is the main entry point for the server-side application. It typically exports a function to bootstrap the Angular application on the server. -
src/server.ts(or similar name likeserver.mjsafter build): This file sets up the Express server (or your chosen Node.js server) that will handle incoming requests and use theAngularNodeAppEngine(from@angular/ssr/node) to render your Angular app. -
package.json:
You'll find new scripts for SSR:"scripts": { "ng": "ng", "start": "ng serve", "build": "ng build", "watch": "ng build --watch --configuration development", "test": "ng test", "serve:ssr:ng-v20-ssr-demo": "node dist/ng-v20-ssr-demo/server/server.mjs" },And dependencies like
@angular/ssrandexpress. -
src/app/app.routes.server.ts: This is crucial for defining server-specific routing strategies if needed, and often where you might fine-tuneRenderModeper route. By default, all routes (path: '**') are often set toRenderMode.PrerenderorRenderMode.Server.import { Routes } from '@angular/router'; import { appRoutes } from './app.routes'; // Your client-side routes import { RenderMode, ServerRoute } from '@angular/ssr'; export const serverRoutes: ServerRoute[] = [ { path: '**', // Catch-all or specific routes renderMode: RenderMode.Server, // Or .Prerender, or .Client loadChildren: () => Promise.resolve(appRoutes) // Reference your app's routes } ];
3. Understanding Render Modes:
Angular provides fine-grained control over how routes are rendered:
RenderMode.Server: True SSR. The page is rendered on the server for each request.RenderMode.Prerender(often the default with--ssr): Static Site Generation (SSG) style. Pages are rendered at build time into static HTML files. Great for content that doesn't change frequently per user.RenderMode.Client: Falls back to traditional CSR for specific routes.
You can configure these in your app.routes.server.ts or directly in the routing module if not using serverRoutes.
4. Building and Running the App:
-
Development Mode (with
ng serve):
When you runng serve, Angular's dev server often handles SSR emulation.ng serveOpen
http://localhost:4200.
If you add aconsole.log('App initialized');in yourAppComponent'sngOnInit, you'll see it logged:- In your server terminal (because
ng serveis running a dev server that does SSR). - In your browser console (because the client-side app bootstraps and re-runs
ngOnInitduring hydration).
- In your server terminal (because
-
Production-like Build and Run:
To see the true production behavior:-
Build the application:
ng buildThis creates
browserandserverbundles in yourdist/your-app-name/directory. -
Run the server:
Use the script frompackage.json:npm run serve:ssr:ng-v20-ssr-demo # This typically runs something like: # node dist/ng-v20-ssr-demo/server/server.mjsThis starts the Node.js/Express server, usually on port
4000.
-
5. Verifying SSR:
Open http://localhost:4000 (or the port your SSR server is running on).
-
View Page Source: Right-click on the page and select "View Page Source" (Ctrl+U or Cmd+Option+U).
- With SSR/Prerender: You'll see the actual HTML content of your application (e.g.,
<h1>Hello, ng-v20-ssr-demo-app</h1>) inside the<app-root></app-root>tags. - With CSR (if a route is set to
RenderMode.Client): You'll only see<app-root></app-root>and some script tags. The content isn't in the initial HTML.
- With SSR/Prerender: You'll see the actual HTML content of your application (e.g.,
-
Console Logs (with
AppComponent'sngOnInitlog):RenderMode.Server: When you access a page, theconsole.logwill appear in your Node.js server terminal first. Then, after hydration, it will also appear in the browser console.RenderMode.Prerender: Theconsole.logwill appear in your Node.js server terminal during theng buildprocess. When you access the page vianpm run serve:ssr, you'll only see it in the browser console (as the server is just serving static pre-built HTML).RenderMode.Client: Theconsole.logwill only appear in the browser console.
Let's illustrate changing RenderMode:
In src/app/app.routes.server.ts:
// src/app/app.routes.server.ts
import { Routes } from '@angular/router';
import { appRoutes } from './app.routes';
import { RenderMode, ServerRoute } from '@angular/ssr';

export const serverRoutes: ServerRoute[] = [
  {
    path: '**',
    // renderMode: RenderMode.Server, // For dynamic SSR
    // renderMode: RenderMode.Prerender, // For SSG-like behavior (default with --ssr)
    renderMode: RenderMode.Client, // To force CSR for all routes
    loadChildren: () => Promise.resolve(appRoutes)
  }
];
If you set it to RenderMode.Client and run ng serve:
- The "App initialized" log from
ngOnInitwill only show in the browser console. - Viewing page source will show an empty
<app-root>.
If you set it to RenderMode.Server and run ng serve:
- The "App initialized" log will show in the server terminal and the browser console.
- Viewing page source will show the rendered HTML.
Choosing the Right Strategy
- Client-Side Rendering (CSR): Still viable for highly interactive dashboards or internal tools where initial load SEO isn't paramount, and subsequent navigations need to be snappy.
- Server-Side Rendering (SSR with
RenderMode.Server): Ideal for dynamic content that needs excellent SEO and fast perceived initial load (e.g., e-commerce product pages, news articles). - Pre-rendering (SSG with
RenderMode.Prerender): Perfect for static or mostly static content like blogs, landing pages, or documentation sites. It gives the benefits of SSR without the per-request server overhead.
Often, a hybrid approach is best, where some routes are pre-rendered, some are server-rendered, and others might even be client-rendered.
What's Next? Hydration and Beyond!
We've covered the fundamentals of SSR in Angular and how to get a basic setup running. But this is just the beginning! The next crucial piece of the puzzle is Hydration, the process that makes your server-rendered static HTML interactive on the client. And beyond that, Angular's new @defer block offers even more granular control over lazy loading and rendering, working beautifully with SSR.
Stay tuned for future explorations into these topics as we continue to unlock the full potential of modern Angular development!