Beginners guide to webpack — How to start a basic application with webpack 2
Today’s world of web development is booming with cool tools and packages that you can use for your web apps. Some important parts of which…


Today’s world of web development is booming with cool tools and packages that you can use for your web apps. Some important parts of which is bundling your web apps, handling minification of the files and related tasks for production and last but not the least, live-reloads (we love them 🤓).
In the past, there have been many tools web developers have gone through. Gulp and Grunt would be one of the popular tools that the web developers (including me) have been using. My favorite has been Gulp btw ;)
Lately, I’ve become a big fan of Webpack because of the seamless ways it works with and because it is not just a task runner but has a great dependency graph management which was not really a thing in most of the previous tools. You can read more about when to use webpack and why here. One more reason to go for webpack is because some of the amazing teams like Angular have switched to webpack because of its amazing performance and features.
Lets get to the business. The tutorial/guide assumes you already have NodeJS installed in your machine. You can check that by running in your terminal:node --version
If every thing is fine, it should print something like `v7.7.1`.
Installation
So first, let’s install `webpack` and `webpack-dev-server` (we’ll need it later) globally in our machinenpm install -g webpack webpack-dev-server
Note that this is not a recommended practice. Installing globally locks you down to a specific version of webpack and could fail in projects that use a different version. See webpack docs for details.
After that, create a folder <my-project-name> . I’ll use webpack-demo as a folder for this tutorialmkdir webpack-demo
cd webpack-demo
Creating project
You can open this folder into your favorite editor. Mine is VSCode these days. Create a file index.html and paste the following code into it<!DOCTYPE html>
<html lang="en">
<head>
<meta charset="UTF-8">
<title>Basic application with Webpack</title>
<link href="main.css">
</head>
<body>
<h1>WebPack works !!</h1>
<script src="bundle.js"></script>
</body>
</html>
Then create the file in the current folder and paste a simple code snippet inside:console.log("Hello webpack. Demo works");
You’ll notice that we’ve included bundle.js in our index.html but we’ve created main.js here. That’s because webpack will bundle our js file and will create the bundle.js file in the end. We will do that by running the commandwebpack main.js bundle.js
This will give an output likeHash: ec10d1136042776794c4
Version: webpack 2.6.1
Time: 71ms
Asset Size Chunks Chunk Names
bundle.js 2.65 kB 0 [emitted] main
[0] ./main.js 19 bytes {0} [built]
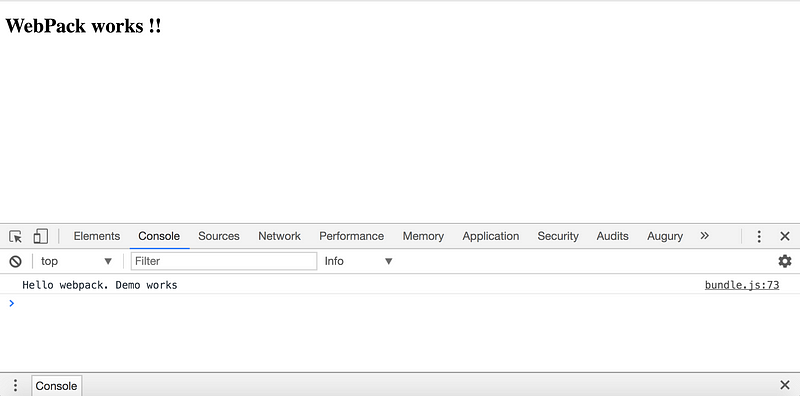
If you open the index.html, and open your chrome debugger, it will look like this
You can also create a css file as we’ve included in our index.html. So create main.css at your project root and add some sample styles. Let’s give the page a grey-ish background and our heading blue colorbody{
background: #dcdcdc;
}
h1{
color: blue;
}
Using webpack config file
We can tell webpack what to do in a config file webpack.config.js and that’ll allow us to use the command webpack without specifying the source (main.js) and the target (bundle.js) and this becomes more powerful when we add loaders and stuff and more configurations. We’ll look into that later.
Create a file webpack.config.js in your project and add the following basic snippet to it:module.exports = {
entry: './main.js',
output: {
filename: './bundle.js'
}
};
The configuration is pretty simple. entry is the file which’ll be the root of your dependency graph and the entry file for webpack where as the output contains the filename of the output file. And we use the output file in our index.html then. So once you’re done with this, try running the command webpack on your project root from terminal. You should get the same output as before on console.
Watch and build on the go
You can tell webpack to watch for your files and run the build process as soon as something is changed in your files by adding watch: true in our webpack.config.js . Your file should look like this nowmodule.exports = {
entry: './main.js',
output: {
filename: './bundle.js'
},
watch: true
};
You can run the commandwebpack now and if you change anything in your main.js , webpack will recompile and build the bundle.js.
Development Server
More cool stuff. Because opening index.html is too old school now and we’re into live-reloads while developing, we can do it simply using the webpack-dev-server that we installed earlier. This comes with a small express app so you just provide your javascript file and you’re ready to go. Just in your project root from terminal, run the command belowwebpack-dev-server
Boom ! Your project can now be seen on http://localhost:8080/webpack-dev-server/
What’s amazing is that if you do any changes to your main.js or to main.css , the server will live reload and you don’t have to do ctrl+R / command+R every time. Try that !
Loaders
Loaders can be considered as tasks as they were in other previous tools. They can be used to do things like require() to load other modules and files. Webpack does not include loaders out of the box. And it shouldn’t anyways because it’ll become a lot heavier. However there’re a lot of loaders that can be installed via npm or yarn . We’ll be using npm for this tutorial and will use babel-loader for writing some ES6 code and will use css-loader and style-loader to import our main.css file inside our main.js .
Open terminal from project root and execute the following commands.npm init -y
npm install --save-dev babel-loader babel-core babel-preset-env
npm install --save-dev css-loader style-loader
npm init -y creates package.json in your project which we’ll use to save development dependencies and to add loaders to our project.
npm install --save-dev babel-loader css-loader style-loader installs these loaders via npm and saves them in the node_modules folder inside our project.
Now, to work with the installed loaders, we have to inform our webpack.config.js to use them while creating the builds or while running the web server. We’ll do it by modifying our config file as follows:module.exports = {
entry: './main.js',
output: {
filename: './bundle.js'
},
watch: true,
module: {
rules: [
{
test: /\.css$/,
use: [
{ loader: "style-loader" },
{ loader: "css-loader" }
]
},{
test: /\.js$/,
exclude: /(node_modules|bower_components)/,
use: {
loader: 'babel-loader',
options: {
presets: ['env']
}
}
}]
}
};
Now we can write ES6 code in our main.js which will compile to ES5. Change the content of the file main.js to the followingimport style from './main.css';const appName = 'Webpack Demo App';
setTimeout(
() => alert(`Thanks for using ${appName}`)
, 500);
The above code will be compiled to ES5 javascript and will be included in bundle.js
For the css, we can remove the <link href="main.css> from our index .html as we’ve already imported that in our main.js
Conclusion
Webpack is a great tool for web development as it works with many packages to make the development rapid and easy. If this tutorial helped you, do give it a recommend, follow me on twitter and github. You may connect with me on LinkedIn too.