Native Observables Have Landed in Chrome: What You Need to Know!

Hold onto your callbacks, web developers! Something exciting has landed in Chrome 135: Native Observables have officially arrived. ✨
If you've dabbled in libraries like RxJS, the term "Observable" probably rings a bell. It's a powerful pattern for handling asynchronous events and data streams. Now, instead of relying solely on external libraries, the browser itself is getting in on the action.
The headline feature? Deep integration directly into the Web APIs we already use.
Demo
Before we dive in, the code examples below are part of a runnable demo. To try them yourself (make sure to run in Chrome 135+)
Meet the .when() Method: Your New Event Buddy
Traditionally, if we wanted to react to events like button clicks or mouse movements, we'd reach for addEventListener:
// The classic way
const myButton = document.getElementById('someButton');
myButton.addEventListener('click', (event) => {
  console.log('Button clicked the old-fashioned way!', event.clientX);
});
With Native Observables, DOM elements (like buttons, or even document itself) get a shiny new method: .when(). Calling .when() with an event name gives you back an Observable representing a stream of those events.
// The new, observable way
const myButton = document.getElementById('someButton');
const click$ = myButton.when('click'); // Returns an Observable!

// We'll use our custom log function for the demo console
click$.subscribe((event) => {
  log(`Button clicked, observably! X: ${event.clientX}`);
});
Instead of passing a callback directly, we get an Observable that we can subscribe to. This opens the door to chaining operators for more complex event handling. Let's see how they differ from what you might know from libraries like RxJS.
Key Differences from RxJS Observables
Native Observables have their own distinct personality. Think of them as RxJS's cousin who grew up directly in the browser environment.
1. Multicasting Behavior by Default (Shared Streams)
- What it means: When you create an Observable using
.when()or new Observable(), it's automatically "shared". The underlying event listener (or the code inside new Observable) only gets set up once, when the first subscriber arrives. Subsequent subscribers tap into that same existing stream. Importantly, they don't get any events that happened before they subscribed.- The first subscription starts logging coordinates immediately.
- After 2 seconds, a second subscription joins the same stream. It doesn't restart the listener or get coordinates from the first 2 seconds.
- Both stop after a further 5 seconds.
Diagram: This visualizes how the second subscriber joins without restarting the source.
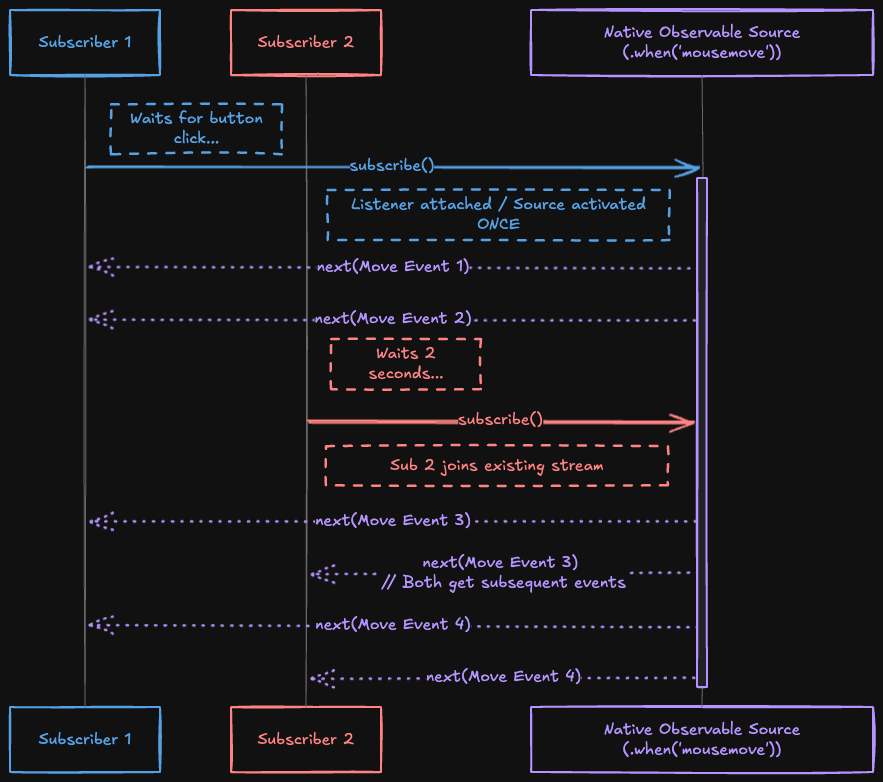
Try it: Click the "Track Mouse Movements" button in the demo.
// Example 1: Mouse Movement Tracking (from main.ts)
const mouseMoveBtn = document.querySelector<HTMLButtonElement>('#mouseMove')!;

mouseMoveBtn.addEventListener('click', () => {
  log('Starting mouse movement tracking...');
  mouseMoveBtn.classList.add('active');
  const move$ = document.when('mousemove'); // The shared source

  // First subscriber activates the listener
  const controller1 = new AbortController();
  activeControllers.push({ controller: controller1, button: mouseMoveBtn });
  move$.subscribe(
    (e: MouseEvent) => log(`Sub 1: x=${e.clientX}, y=${e.clientY}`),
    { signal: controller1.signal }
  );

  // Second subscriber joins later
  setTimeout(() => {
    log('Adding second subscriber...');
    const controller2 = new AbortController();
    activeControllers.push({ controller: controller2, button: mouseMoveBtn });
    move$.subscribe(
      (e: MouseEvent) => log(`Sub 2: x=${e.clientX}, y=${e.clientY}`),
      { signal: controller2.signal } // Needs its own controller
    );

    // Stop both after 5 more seconds (simplified cleanup shown)
    setTimeout(() => {
      controller1.abort();
      controller2.abort();
      // ... (rest of cleanup logic from the demo code) ...
      log('Stopped mouse tracking');
    }, 5000);
  }, 2000);
});
2. Operators are Methods (No pipe())
- What it means: Remember chaining operators like map, filter, etc., using
.pipe()in modern RxJS? Native Observables go back to basics: these operators are methods directly on the Observable object itself.
Try it: Click the "Track Left-side Clicks" button. Only clicks on the left half of the browser window will be logged, and the message is transformed by map.
// Example 2: Left-side Clicks (from main.ts)
const leftClickBtn = document.querySelector<HTMLButtonElement>('#leftClick')!;

leftClickBtn.addEventListener('click', () => {
  log('Tracking clicks on left side of window...');
  leftClickBtn.classList.add('active');
  const controller = new AbortController(); // For stopping later
  activeControllers.push({ controller, button: leftClickBtn });

  document.when('click')
    .filter((e: MouseEvent) => e.clientX < window.innerWidth / 2) // Filter is a method
    .map((e: MouseEvent) => `Clicked left! X: ${e.clientX}`)      // Map is a method
    .subscribe(
      message => log(message),
      { signal: controller.signal } // Pass signal for cancellation
    );

  // Stop after 10 seconds (simplified cleanup shown)
  setTimeout(() => {
    controller.abort();
    // ... (rest of cleanup logic from the demo code) ...
    log('Stopped tracking left clicks');
  }, 10000);
});
3. Some Operators Return Promises (Async Flow Friendly)
- What it means: Certain operators that naturally signal the end of a stream (like
first(),last(),reduce(),forEach()) don't return another Observable. Instead, they return a Promise! This makes them super convenient to use with async/await. You don't even need an explicit.subscribe()in these cases.
Try it: Click the "Get Next Keypress" button. The code will pause (await) until you press any key, then log that key's information.
// Example 3: Next Keypress (from main.ts)
const nextKeyBtn = document.querySelector<HTMLButtonElement>('#nextKey')!;

nextKeyBtn.addEventListener('click', async () => {
  log('Waiting for next keypress...');
  nextKeyBtn.disabled = true; // Disable button while waiting
  nextKeyBtn.classList.add('active');

  // .first() returns a Promise<Event>, perfect for await
  const event = await document.when('keydown').first();

  log(`Key pressed: ${event.key} (Code: ${event.code})`);
  nextKeyBtn.disabled = false;
  nextKeyBtn.classList.remove('active');
});
Diagram: Conceptually, the stream transforms into a single awaited value.

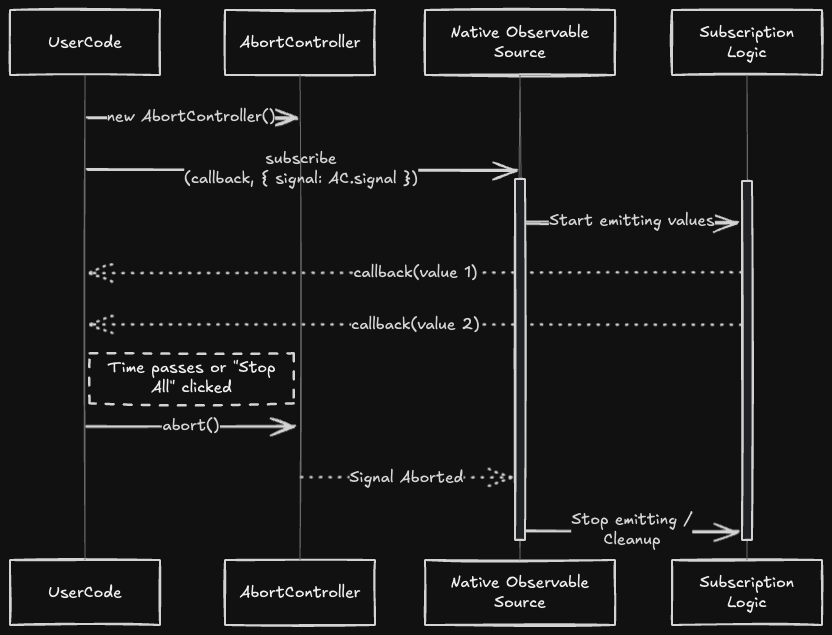
4. AbortController for Unsubscribing (Web Platform Style)
- What it means: Instead of calling
.unsubscribe()on a subscription object like in RxJS, you cancel Native Observable subscriptions using the standard AbortController pattern. You pass the controller's signal when subscribing, and call controller.abort() when you want to stop. - Look Closely: All the button examples (except "Get Next Keypress" which uses
await .first()) use this pattern! The demo code manages these controllers in the activeControllers array and provides a "Stop All" button that calls.abort()on all of them.
Example Pattern (Seen in Mouse/Click/Interval examples):
// General Pattern
const controller = new AbortController();
activeControllers.push({ controller, /* ... button info ... */ }); // Track it

someObservable$.subscribe(
  value => log(/* ... */),
  { signal: controller.signal } // Provide the signal
);

// Later, to stop:
controller.abort();
// ... remove from activeControllers ...
Diagram: This shows the flow of subscribing with a signal and aborting.
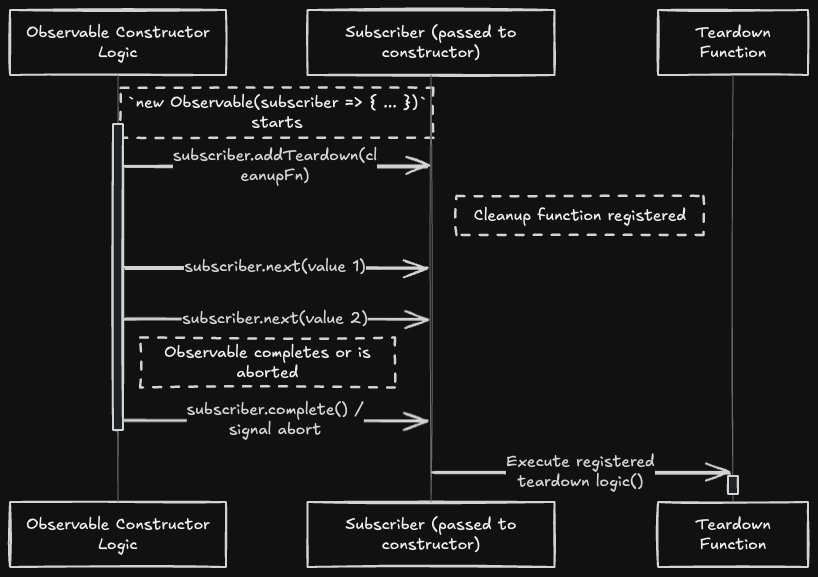
5. Teardown via addTeardown() (Explicit Cleanup)
- What it means: When creating a custom Observable with
new Observable()(not from.when()), you don't return a cleanup function directly from the constructor anymore. Instead, you callsubscriber.addTeardown()inside the constructor to register your cleanup logic (like clearing intervals or timeouts). This logic runs when the observablecomplete()s or is aborted via itsAbortSignal.
Try it: Click the "Start Interval" button. It logs numbers 0 through 5, then automatically completes. The addTeardown function ensures the clearInterval happens correctly upon completion or if you click "Stop All" prematurely.
// Example 4: Interval with Teardown (from main.ts)
const intervalBtn = document.querySelector<HTMLButtonElement>('#interval')!;

intervalBtn.addEventListener('click', () => {
  log('Starting interval...');
  intervalBtn.classList.add('active');

  const interval$ = new Observable((subscriber) => {
    let count = 0;
    const intervalId = setInterval(() => {
      subscriber.next(count++);
      if (count > 5) {
        subscriber.complete(); // Signal completion
        // No need to manually remove 'active' here if completion stops it
      }
    }, 1000);

    // Register cleanup logic using addTeardown
    subscriber.addTeardown(() => {
      log('Clearing interval');
      clearInterval(intervalId);
      intervalBtn.classList.remove('active'); // Ensure button state is reset
    });
  });

  const controller = new AbortController();
  activeControllers.push({ controller, button: intervalBtn });
  interval$.subscribe(
    val => log(`Interval: ${val}`),
    { signal: controller.signal }
    // Note: The Observable completes itself, but the AbortController allows early stopping.
  );
});
Diagram: Registering cleanup during construction, executing on completion/abort.
Language Feature or Web API?
It's still a bit up in the air whether Observable will become a core JavaScript language feature (like Promise) or remain primarily a browser-level Web API. This distinction matters for how widely it might be adopted outside the browser (like in Node.js). For now, it's a powerful addition to the browser's toolkit.
So... What Now?
Native Observables offer a standardized, built-in way to handle event streams declaratively. The .when() method makes interacting with DOM events particularly neat, and the alignment with AbortController feels very "web platform native".
While they share DNA with RxJS, remember the key differences. Play around with the demo code (don't forget the "Stop All" button!) to get a feel for how they work.
It's an exciting time for event handling on the web! Give .when() and maybe even new Observable a try. Happy observing! 😉