I Built the Same App Twice With Gemini CLI ... One With Research, One Without. The Difference Was Ridiculous

The setup, in one sentence
I gave Gemini CLI the same brief twice. Build a social posts generator with Genkit that takes a topic and outputs a LinkedIn post, an X post, and a Facebook post. Same architecture. Same UI. Same test topic.
The only difference between run #1 and run #2: the second run was allowed to query a NotebookLM notebook pre-loaded with research on Genkit internals and platform-specific copywriting.
The architecture both runs produced was almost identical. The content of the posts was not. Read them out loud and you can hear the difference instantly.
This post is the follow-along for the video. Every prompt, every config file, every install step, in the order they appear in the build. If you're watching the video on a phone or your second monitor, this page is your copy-paste source of truth.
Heads up: Genkit's MCP server is currently marked experimental. The shape of the tools and the docs bundle URL may change. Check the Genkit MCP docs before you start if you're seeing anything weird.
What you need before you start
- Node.js 22 or newer
- A Google AI Studio API key (for Gemini)
- Gemini CLI installed and authenticated
- A NotebookLM account (notebooklm.google.com)
- The NotebookLM MCP server connected to Gemini CLI (covered below)
- About 30 minutes. Most of it goes into building the notebook, which you do once and reuse forever.
Step 1: Build the NotebookLM notebook
Do this part first. The whole point of the comparison is that the research is already there waiting to be queried by the time you start prompting Gemini.
Create a new notebook in NotebookLM. Name it something clear (mine is "Genkit: Building, Debugging, and Deploying AI Applications") and load it with 30 to 50 sources.

You have two options for sources:
- Manual: drop in URLs and PDFs you already trust (Genkit docs, blog posts about LinkedIn hook formulas, X engagement guides, etc.).
- NotebookLM's own research feature: give it search terms and let it pull sources for you. Faster, broader coverage, less curation.
I went with option 2 using the search terms below. Copy them straight into NotebookLM's research input, one batch at a time:
Genkit engineering:
Google Genkit flows structured output Node.js
Genkit Zod schema validation AI output
Genkit multi-flow composition Express integration
Genkit dev UI traces debugging AI flows
Google Gemini API Node.js provider configuration
Genkit defineFlow defineTool generate function
Platform copywriting:
LinkedIn post hook formulas high engagement 2026
LinkedIn algorithm 2026 creator content best practices
LinkedIn optimal post length character count engagement
X Twitter 280 character post writing optimization
X Twitter hook writing first line engagement rate
Facebook post writing conversational engagement 2026
social media copywriting platform-native voice guide
hashtag strategy LinkedIn X Facebook best practices 2026
emoji usage conventions professional social media posts
brand voice adaptation multi-platform content strategy
Announcement-specific:
Series A funding announcement copywriting examples
startup announcement social media post frameworks
CTA writing social media posts click-through rate
social media algorithm behavior 2026 reach organic
Once the sources are loaded, copy the notebook ID from the URL. That's what lets the MCP server query it. You'll need the notebook ID for the second prompt.
Don't want to build your own notebook right now? I've made mine public so you can use it for this walkthrough. The notebook ID is in the Prompt #2 block further down. For your own production work though, you'll want a notebook tuned to your domain. More on that at the end.
Step 2: Set up the Genkit MCP server
This server is shared by both runs. It does two important things:
- Lets Gemini search the live Genkit docs bundle while writing code, so you don't get hallucinated
defineFlowsignatures from stale training data. - Lets Gemini execute the flows it just wrote without you running anything manually.
Install the Genkit CLI globally
npm install -g genkit-cli
Register the MCP server with Gemini CLI
Open ~/.gemini/settings.json (create it if it doesn't exist) and add a mcpServers entry:
{
  "mcpServers": {
    "genkit": {
      "command": "genkit",
      "args": ["mcp"],
      "cwd": ".",
      "timeout": 30000
    }
  }
}
That's it. Restart Gemini CLI and the tools below become available to it.
What Gemini gets through the Genkit MCP server
| Tool | What it does |
|---|---|
get_usage_guide |
Pulls current Genkit framework best practices |
list_genkit_docs / search_genkit_docs |
Searches the Genkit documentation bundle |
start_runtime / kill_runtime |
Starts and stops the Genkit runtime process |
list_flows |
Discovers all defined flows in the project |
run_flow |
Executes a flow with JSON input |
get_trace |
Retrieves execution trace details |
The first time you use any of these, Gemini will auto-download the docs bundle from genkit.dev/docs-bundle-experimental.json. If you see a brief pause on the first call, that's what's happening.
Why this matters even before the NotebookLM comparison
Even on the vanilla run (no notebook), the Genkit MCP server is the difference between Gemini guessing at API shapes and Gemini reading the current docs. The fair comparison isn't "with research vs without research." It's "with Genkit docs access vs with Genkit docs access plus copywriting research." Both runs get current code. Only one run gets current thinking about the content.
Step 3: Set up the NotebookLM MCP server
This one is only used in run #2. Connecting NotebookLM to Gemini CLI lets the model query your notebook the same way you would, by asking questions in natural language and getting cited answers back.
You'll find the connection instructions on the NotebookLM MCP github readme. Once it's connected, Gemini can call tools that look something like query_notebook(notebookId, question) and get back grounded responses with source citations.
For the run, you only need three things ready:
- The notebook is public (or at least accessible to your account)
- You have the notebook ID copied (the long UUID-looking string)
- The MCP server is showing as connected in your Gemini CLI session
Step 4: Prompt #1, vanilla Gemini CLI (no notebook)
Open a fresh, empty directory. Start Gemini CLI inside it. Paste this prompt verbatim:
Build a social media post generator using Node.js, Google Genkit, and the
Gemini model.

Use the genkit MCP server throughout: call search_genkit_docs / get_usage_guide
before writing flows so the code matches current Genkit conventions, and after
building call start_runtime then run_flow on each platform flow with the test
topic to verify the structured output before handing off.

Input: one topic or announcement
Output: three posts, one for LinkedIn, one for X, one for Facebook

Architecture requirements:
- Separate Genkit flows per platform (linkedinFlow, xFlow, facebookFlow)
- Zod schemas for structured output per platform: { hook, body, hashtags,
  cta, charCount }
- A multi-flow orchestration layer that calls all three in parallel
- Express server with POST /generate endpoint and GET / for the HTML UI
- Genkit dev UI exposed at /genkit for trace inspection
- Proper Gemini provider configuration via Genkit plugin
- Clean separation: flows.js, server.js, public/index.html

UI/UX requirements, build a modern, beautiful interface:
- A single polished page with a large topic textarea and a prominent
  Generate button at the top
- Three platform preview cards (LinkedIn, X, Facebook) displayed in a
  responsive grid, each loosely styled to resemble its platform's real UI
  (LinkedIn blue/white card, X dark card, Facebook blue/light card)
- Each card shows: the post body rendered with proper line breaks,
  hashtags as chips, and a live character count badge (green under
  platform limit, red over)
- Copy-to-clipboard button on every card
- Smooth loading skeleton states while posts are being generated
- Clean typography, generous spacing, subtle shadows, rounded corners,
  modern color palette, fully responsive
- Dark mode aware

Test topic: "Announcing our Series A funding round of $12M"
Let it run end to end. Don't intervene unless it gets stuck. Things you want to see:
search_genkit_docscalls firing in the terminal. Good sign. It's grounding the code in current conventions.- Three flow files generated (
linkedinFlow,xFlow,facebookFlow) with Zod output schemas - An Express server scaffolded with
/generateand the HTML UI start_runtimefollowed by threerun_flowcalls with the Series A test topic. That's the verification step.
When it finishes, run npm install, set your GEMINI_API_KEY in .env, start the server, and open http://localhost:3000. Generate a post for the test topic. Save the output somewhere. You'll want it for the comparison.
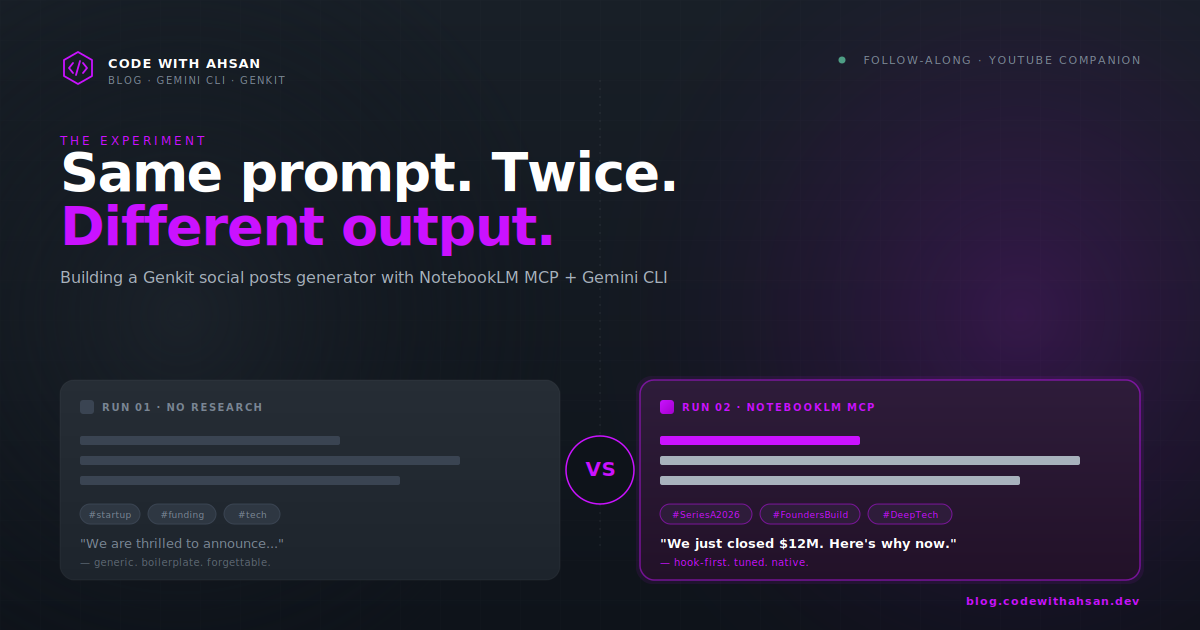
The architecture will probably be solid. The code will probably work. The posts themselves will be... fine. Generic. The kind of LinkedIn post that says "We are thrilled to announce" and ends with three rocket emojis.
That's the baseline. Now run it again.
Step 5: Prompt #2, same brief plus a notebook to query
Wipe the directory (or start a new one). Restart Gemini CLI so it forgets the previous run. Paste this prompt:
Build a social media post generator using Node.js, Google Genkit, and the
Gemini model.

I have a NotebookLM notebook called "Genkit: Building, Debugging, and Deploying
AI Applications" (ID: 5e51aad5-ccef-4b69-9cc5-5230bd0ebbf9) that already
contains curated research on Genkit engineering and platform-specific
copywriting (LinkedIn hook formulas, X character optimization, Facebook
conversational openers, hashtag strategy per platform, emoji conventions, and
2026 algorithm behavior).

Before writing any code, query this notebook to pull everything relevant to
building a production-quality social posts generator. Make multiple queries
if needed to cover all areas. Then build the generator applying ALL the
research findings to both the Genkit architecture and the content of each
post.

Use the genkit MCP server throughout: call search_genkit_docs / get_usage_guide
before writing flows so the code matches current Genkit conventions, and after
building call start_runtime then run_flow on each platform flow with the test
topic to verify the structured output before handing off.

Input: one topic or announcement
Output: three posts, one for LinkedIn, one for X, one for Facebook

Architecture requirements:
- Separate Genkit flows per platform (linkedinFlow, xFlow, facebookFlow)
- Zod schemas for structured output per platform: { hook, body, hashtags,
  cta, charCount }
- A multi-flow orchestration layer that calls all three in parallel
- Express server with POST /generate endpoint and GET / for the HTML UI
- Genkit dev UI exposed at /genkit for trace inspection
- Proper Gemini provider configuration via Genkit plugin
- Clean separation: flows.js, server.js, public/index.html

UI/UX requirements, build a modern, beautiful interface:
- A single polished page with a large topic textarea and a prominent
  Generate button at the top
- Three platform preview cards (LinkedIn, X, Facebook) displayed in a
  responsive grid, each loosely styled to resemble its platform's real UI
  (LinkedIn blue/white card, X dark card, Facebook blue/light card)
- Each card shows: the post body rendered with proper line breaks,
  hashtags as chips, and a live character count badge (green under
  platform limit, red over)
- Copy-to-clipboard button on every card
- Smooth loading skeleton states while posts are being generated
- Clean typography, generous spacing, subtle shadows, rounded corners,
  modern color palette, fully responsive
- Dark mode aware

Test topic: "Announcing our Series A funding round of $12M"
The notebook ID in the prompt above is mine and it's public, so you can use it directly for this walkthrough. If you want fresh research tailored to your niche, build your own notebook (covered at the end).
Watch the terminal. The first thing it does now is fan out a series of queries against the notebook: LinkedIn hooks, X length optimization, Facebook tone, hashtag strategy. Then it pulls Genkit docs. Then it starts writing code.
When it's done, run it. Generate a post for the same Series A topic.
Step 6: Read both versions out loud
This is the actual experiment. Don't just skim the JSON. Read the LinkedIn post, the X post, and the Facebook post out loud for each run.
Here's the kind of pattern you'll likely see:
- Vanilla LinkedIn post: opens with "We are thrilled to announce." Boilerplate hashtags. Generic CTA ("Learn more!"). Reads like every funding post you've ever scrolled past.
- Research-enhanced LinkedIn post: opens with a hook formula the notebook had marked as high-engagement. Length tuned to the platform's preferred range. CTA framed around a specific reader action. Hashtags chosen for reach, not vibes.
- Vanilla X post: ~270 characters, hook buried in the second clause, three rockets.
- Research-enhanced X post: hook in the first six words, body trimmed to leave breathing room, one emoji used for emphasis instead of decoration.
- Vanilla Facebook post: essentially the LinkedIn post with a different hashtag.
- Research-enhanced Facebook post: conversational opener, written for the engagement style the platform actually rewards.
The architecture didn't move. Same flows, same Zod schemas, same Express server. Almost identical UI. The only thing that changed was the judgment the model brought to the content. And that judgment came from the notebook.
What this actually demonstrates
I want to be careful here, because the easy takeaway is "RAG is magic." It isn't. Here's the more useful framing.
LLMs are extraordinarily good at applying patterns. They are mediocre at picking which pattern to apply when the right answer depends on context they don't have. A LinkedIn hook formula isn't something the model invents in the moment. It's something that exists in writing somewhere, and the model either has access to it or it doesn't.
The notebook isn't doing anything mystical. It's giving the model a curated reference library to consult, the way a senior copywriter would consult their swipe file. And because NotebookLM hands back cited, grounded answers (not just embeddings), the model can use the references confidently instead of guessing whether they apply.
Two practical consequences:
- Curate the notebook like you'd hire a researcher. Garbage sources, garbage posts. The 30 to 50 source list above isn't arbitrary. Every term targets a known weak spot in default LLM output.
- The pattern generalizes. Swap "social copywriting" for any domain with strong written craft norms (legal drafting, technical RFCs, medical documentation, sales emails) and the same setup gives you the same lift.
This is also why I keep saying on the channel: AI is a tool you direct, not a tool you follow. Run #1 is what you get when you let the model pick the patterns. Run #2 is what you get when you pick them.
Things that will probably go wrong (and how to fix them)
Genkit MCP tools don't show up. Restart Gemini CLI fully after editing ~/.gemini/settings.json. The CLI only loads MCP config at startup.
start_runtime hangs. Make sure no other Genkit dev process is running on the default port. Run lsof -i :4000 (or the port Genkit logs) and kill anything stale.
NotebookLM MCP queries return nothing useful. Your notebook either isn't public or the sources aren't actually about what the search terms suggested. Open the notebook, ask it the same questions yourself in the NotebookLM UI, and see what it says. If you don't get good answers there, Gemini won't either.
The run_flow call returns valid JSON but bad content. That's exactly what run #1 looks like. It's working as expected. Re-read step 5.
Zod schema mismatch errors. Genkit's defineFlow is strict. If Gemini's output doesn't match the schema, the flow fails loudly. Tell it to call search_genkit_docs for "structured output Zod schema" and it will usually self-correct on the next pass.
Want the prompts as plain files?
Both prompts above are also available as .txt files on the GitHub repo for this video so you don't have to copy them out of a blog post. The repo also includes the final flow files from run #2 (the ones generated with the research) so you can diff them against what you got and see where your model made different choices.
Where to go from here
If you build this and it clicks for you, two follow-ups worth doing:
- Build your own notebook for your actual domain. Don't reuse mine for production work. Yours will be more useful because it'll match your voice, your industry, your platforms.
- Try the same comparison with a different agent. Cursor, Claude Code, whatever you use day-to-day. The lift from research-grounding isn't Gemini-specific. It's a property of how LLMs work.
If you've followed along and got it working, drop a screenshot of your two posts side by side in the Discord. I want to see whether the gap is as stark in your domain as it was in this one.
Want more breakdowns like this? Real builds, honest comparisons, no hype. Subscribe to the newsletter for one post like this each week, and join 4,600+ developers in the Discord.